Installation Guide/Manual
Please read the ENTIRE installation guide/manual before installing our unitary rubberized safety surfacing, flooring and paver products and services. Glue MUST be used on almost every installation – unless specified otherwise by the architect, engineer, designer, etc.
Click here for a downloadable (print) version of our Installation Guide/Manual.
PLEASE NOTE: If you were hanging a TV, and it fell off the wall, is it the TV’s fault or did the installer miss the studs? With that being said, please respect our method of installation and install the Unity products and services per the Installation Guide/Manual as noted herein.
Laying Out The Floor:
Our resilient rubberized safety surfacing, flooring and paver products are a great alternative to most standard products found on the market today. The shear size, weight, shapes and design of our products gives it a competitive advantage over other competing products. Installed over practically any existing surface (indoor/outdoor) and rooftops, the products we offer should be installed naturally on a level surface with a slight pitch for drainage.
Unity recommends that our products be laid out over night (un-stacked) before being installed. This allows for ambient temperatures within the products for easier installations. We also recommend positioning the skids (pallets) throughout the installation area. Additionally it would beneficial if you pick one unit from each skid (pallet) when installing the product, thus allowing color blending to occur. This is to avoid seeing blotches of different dye lots during the installation process.
We recommend using either concrete (cement), asphalt (blacktop), compacted recycled concrete (stone quarry, aggregate), any standard roofing membranes or any standard indoor flooring that does not have stress cracks as a sub-surface/sub-base.
Please note: Landscaping Mesh/Geo-Textile Fabric is only needed on loose filled sub-base materials and/or rooftop installations. It is designed to protect your sub-base material and our finished products. 2 The fabric/mesh is a protective slip-sheet that helps the loosed filled sub-base materials from prematurely jarring loose as well as preventing weeds from growing through. For rooftop membranes in particular, the Fabric/Mesh may be required between our products and the roofing membrane to prevent premature deterioration.
 |
|
Rooftop installations must use what the architect, engineer, building designers, green roof or roofing manufacturer recommends. DO NOT COVER DRAINS OR DRAINAGE OUTLETS WHAT-SO-EVER, AS IT WILL IMPEDE THE FLOW OF WATER.
Our products can be cut easily to fit irregular contours, shapes, protrusions, playground posts, smoke stacks, vent pipes, etc. using a one-ten or one-six saber saw (jig saw) blade using soapy warm water or a heavy-duty utility knife (carpet knife) as noted.
|
The sub-surface must be cleaned of excess debris before installations. A broom, leaf-blower or vacuum is a common tool that will achieve this goal. It is important to do this every couple of rows.
Additionally, the newly installed safety surfacing area must be cleaned of any excessive adhesive immediately. In case of over gluing, wipe with a dampened cloth or rag containing a denatured alcohol. In some cases, it is easier to allow the glue to dry and then remove it with a shape tool.
For indoor applications and/or rooftop installations where doors are present, make certain these doors have enough swing clearance to allow for different thicknesses of the tiles/mats/blocks/paver products. If not “Transitional Ramps” or “saddles” will need to be applied allowing enough clearance for the door to swing COMPLETELY open.
Material Storage:
Each skid (pallet) weights approximately 2,000 lbs each. DO NOT STACK PALLETS. Protect the existing sub-surface area and/or roof membrane from potential damage by placing a clean piece of Masonite or plywood between pallet and the sub-surface area and/or roof membrane. Installations on the ground do not require such preparation unless the ground is soft. Make certain the area underneath the skid (pallet) is clear of any and all debris. In some cases, you can temporarily use the tiles/mats/blocks/pavers underneath instead of the masonite/plywood to support the weight. These products will not be damaged or wasted. Additionally, "Unity's" products will not be damaged by weather exposure. However, it is advised to keep the material dry and out of the direct sun prior to installations.
We recommend that our products be laid out (not installed) before installation. This will allow for ambient temperature and consistency within the products themselves to make installations easier. It will also allow for better color matching and consistency during installations.
Tools:
 |
|
- Pen, pencil, marker, chalk - (for marking purposes)
- String-Line - (for running a consistent straight row and or column of tiles/mats/blocks/pavers)
- Ruler and/or Tape Measure - (for measuring your cuts accurately)
- Straightedge and/or Square - (for making your cuts and designs straight and accurately)
- Knee pads - (for kneeling on one's knees during installation purposes for better support).
- Denatured alcohol - (for cleanups of over doing it and/or spilling of the adhesive/glue)
- Utility Knife and/or Saber Saw (AKA: Jig Saw) - (to make your cuts accurately and/or to clean interlocks from any flashing).
- Caulking Gun - (for gluing the interlocks together as well underneath the outside edge of each tile/mat/block/paver being installed). Please note: DO NOT GLUE TO ROOF MEMBRANES.
- Drill Gun/Hammer Drill - (used for the bolt-down application = typical of ground level installations only. The bolt-down application is NOT recommended for rooftop installation. Please consult with the architect, engineer, designer, roofing manufacturer, building owner, etc. prior to installation)
|
Please note: If said tools are NOT cordless, it may be necessary to have extension cords available. Additionally, if there is no electrical service available, a generator may be needed. Keep in mind; generator’s are not to be used indoors what-so-ever.
A “Hand-Roller” rolling across the top of the tiles/mats/blocks/pavers may also be needed to ooze the glue throughout the interlocks once products are installed. If clean from any glue and/or debris, sweeping your foot across the top – outside edge of the tiles/mats/blocks/pavers will work just as well. Check yourself – make sure (from all sides) that the product installed are sitting flat and level.
Layout:
|
For hard or solid sub-base installations such as concrete (cement) - commonly used indoors, asphalt (blacktop) - commonly used outdoors in larger cities and rooftops installations:
Remove all oils, grease, paints, waxes and any other foreign objects and materials by scrapping, sanding, scrubbing or sweeping/ leaf-blowing. When detergents are used, rinse thoroughly and allow adequate time to dry.
Finally, sweep/leaf-blow the installation area clean of any dust, dirt and or debris. Repeat this process every couple of rows to insure that the area remains clean throughout the installation.
|
|

|
For counter-sunk installations: when needed, chisel around wall-to-floor corners to remove excess mortar and produce a square edge. For indoor applications: remove all existing base molding and clean away any accumulated dirt or dust. Make certain that doorways have sufficient swing clearance to allow for the thickness of our tiles/mats/blocks/pavers being installed. It's both difficult an annoying to apply adhesive on a dusty/dirty floor. Complete sweeping and/or blowing clean the floor (both before and during the installation process) is highly recommended to minimize any future problems.
Vinyl/ Asbestos Floor Tiles: These products are most commonly found during indoor applications of our rubberized safety surfacing, flooring & paver products. Contact the EPA (Environmental Protection Agency) for the proper removal of Asbestos tiles if they exist. Remove the old vinyl tiles and/or carpet; scrape off all old mastic until concrete sub-floor is smooth. If unable to remove all mastic by scrapping, then the floor may need to be sanded before installing our products.
If the old floor is in good condition it is possible to install our products directly over it. Remove all wax and floor finishes before starting installations. This process however is not recommended. Such installations are the sole responsibility of the owner / consumer.
Wooded Sub-Surface/Sub-Base: Secure all loose flooring and nails. Replace damaged floorboards and sand all warped or uneven flooring; vacuum or sweep clean.
 Sub-Surface/Sub-Base - (best): The floor, weather indoor or out, must be cured thoroughly before our products are installed. Etching cement or blacktop (noted below) with a 25% solution of commercial grade muratic acid and water (1 part acid 3 parts water) will aid in a permanent bond by roughing the concrete surface. Rinse very, very thoroughly with clear water and allow adequate drying. You may want to repeat rinsing process for added protection. Fill in the cracks and expansion joints or damaged portions of the flooring with mastic floor fill for best results. Moisture tests should be conducted on all NEW concrete or asphalt surfaces, especially on sub-floor grade and on-grade installations. Allow adequate time for new concrete floors to dry – usually ten (10) days or more. MOISTURE IS THE GREATEST BONDING FAILURE. Uneven or unleveled floors can be leveled if necessary. Keep in mind, that if cement or blacktop is your choice for a sub-floor during outdoor applications of our products, there must be a slight pitch of about three (3) degrees to allow rainwater, liquids and debris to properly drain off the edges freely and easily to a drainage outlet.")
|
|
Concrete (cement) Sub-Surface/Sub-Base - (best): The floor, weather indoor or out, must be cured thoroughly before our products are installed. Etching cement or blacktop (noted below) with a 25% solution of commercial grade muratic acid and water (1 part acid 3 parts water) will aid in a permanent bond by roughing the concrete surface. Rinse very, very thoroughly with clear water and allow adequate drying. You may want to repeat rinsing process for added protection. Fill in the cracks and expansion joints or damaged portions of the flooring with mastic floor fill for best results. Moisture tests should be conducted on all NEW concrete or asphalt surfaces, especially on sub-floor grade and on-grade installations. Allow adequate time for new concrete floors to dry – usually ten (10) days or more. MOISTURE IS THE GREATEST BONDING FAILURE. Uneven or unleveled floors can be leveled if necessary. Keep in mind, that if cement or blacktop is your choice for a sub-floor during outdoor applications of our products, there must be a slight pitch of about three (3) degrees to allow rainwater, liquids and debris to properly drain off the edges freely and easily to a drainage outlet.
|
|
Asphalt (Blacktop) Sub-Surface/Sub-Base - (good): Recommended for most outdoor applications – this system must be firm and level (with a slight pitch for drainage - if drainage systems are not available and/or installed), and should also be free of grease, oils and unwanted debris.
Patch holes and fill dips before installation. The epoxy (glue) or adhesive will adhere to these and many other sub-surfaces without failure but extra adhesive will be needed to fill the normal irregularities encountered in this type of sub-surface.
|

|
Please note: Any future separation of asphalt (blacktop), concrete (cement) or any other hard or solid sub-surface layers, heaving, etc. is the sole responsibility if the owners and not the manufactures of our products and services.
Sealing of Sub-Surfaces/Sub-Bases: If the sub-floor is of wood, porous material or extra rough concrete, it must be prepared with epoxy concrete sealer prior to applications of the adhesive/glue and our rubberized safety surfacing, flooring and paver products. This assures that the adhesive/glue will bond rather than soak into the porous sub-surface before it has a chance to react chemically. Allow adhesive/glue to dry over night. Open windows and doors if used indoors for proper ventilation.

|
|
Crushed Stone:
Shall prepare a compacted level sub-grade using a “stone blend” material. Stone base shall be uniformly mixed on a mixing table or by other mechanical means (such as quarry blending operations) prior to placement on the compacted earth surface sub-grade. Stone base shall be bladed and evenly compacted and shall be a minimum of five (5”) inches deep at all locations. Stone base shall be wetted during mixing operations if necessary for proper blending. Moisten and compact with a flat plate vibratory compactor to 95% proctor. Tolerance: 1/4” in any 10ft. direction. Moisten and compact again if necessary.
#1A Chip and Stone Dust or Granite Screening
Shall be installed and compacted to a depth of ½” over the compacted and leveled Stone Base noted above.
|
Geo-Textile Fabric/Mesh for Separation:
Shall be installed between the Stone Base / #1A Stone Dust and Unity’s rubberized safety surfacing, flooring and paver products overlapping the seams 6 to 9” (inches).
|
REMEMBER - Don't forget to use a patting/vibration machine to compact the area level to minimize any waves, hill, valleys, divots, etc. is needed. Next, install a landscaping mesh/geo textile fabric on top. This is to prevent any bugs, debris, weeds, grass or sub-surface materials (loose stones) from pushing up into the product.
This also allows for great drainage of rainwater and liquids thus reducing the possibility for the ground to freeze near the newly installed surfacing, flooring and pavers. Additionally, a ½” thick screening shall be applied and compacted, followed by a mist of water, then fabric prior to installation of play tiles.
|
|
 |
 Save
Save
UNITY only recommends this type of installation of our products as long as there are many watchful eyes on the project as it is highly dependent on the sub-base installers.
Before Starting Installations:
Ask yourself: Is the floor dry? Test yourself, lay a couple of units together for a minimum of twentyfour hours (24) and check if there is moisture underneath. What is the temperature? Temperatures below 40 degrees will retard the curing of the standard adhesives/glues. Do not store the adhesive in temperature below 50 degrees and/or above 100 degrees. Do not leave adhesive/glue in direct sunlight as it will further complicate the installation process.
 |
|
Make sure the male interlocks are trimmed clean of any flashings prior to installing. This will ensure a tight fit, which will extent the life of your investment for many more years to come.
Trimming of the male interlocking systems allows for cleaner, easier and faster installations. It will also move the installation process along more effectively as well.
|
Laying Out The Tiles/Mats/Blocks/Pavers:
|
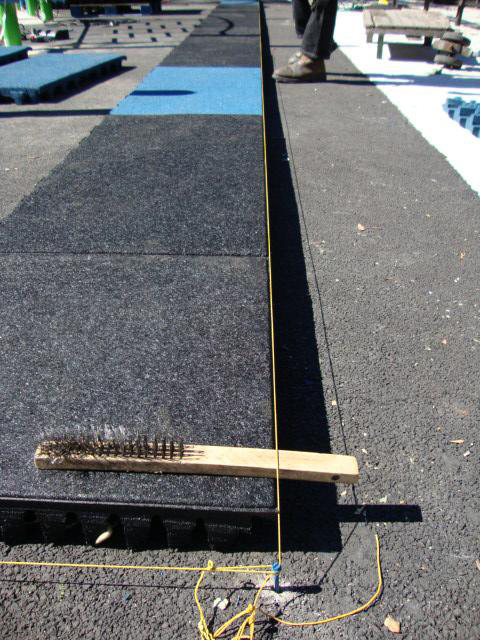
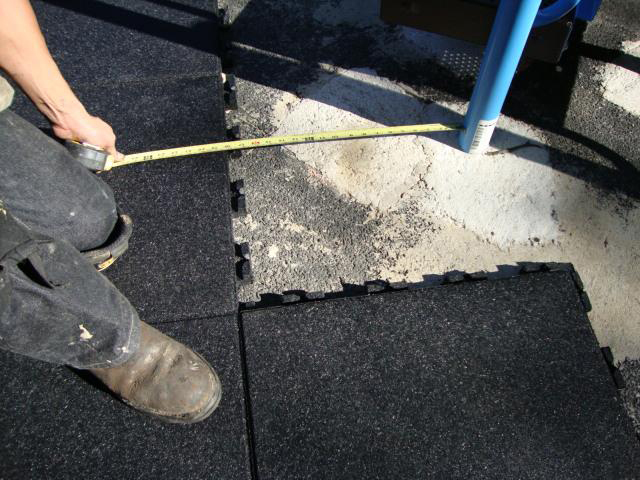
When NOT installing wall to wall (fence to fence, parapet to parapet), establish the start corner and snap a chalk line and/or run a string line (as seen below) in both directions to represent your starting column and row. Repeat the process in the opposite corner.
Once completed, check to see if you are “square” by measuring both corners from corner to opposite corner to assure that the measurement is the same. This will insure a picture perfect (square) installation.
|
|
.JPG "Showing how to start installing the rubber tiles with a straight line") |
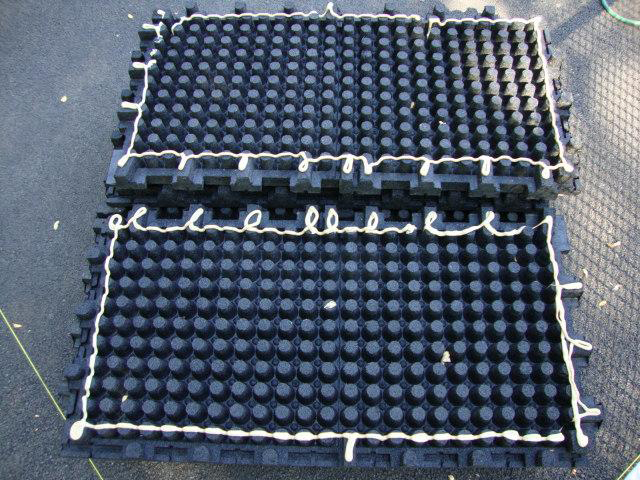
There are two sides with male interlocks ( in this case: the 3 and 6 o’clock positions); And two sides with female interlocks (in this case: 9 and 12 o’clock positions). Bottom View was flipped and reversed simply to show said bottom.
Be sure you are laying them out according to the interlocks. ”Female” interlocks will lock into the “male” interlocks. [Note: products less the 1 ¾” thick (ie. 1” thick Tough-Land series) do not have interlocks and will line up: factory edge to factor edge]. The 1” Tough-Land series can be installed as described herein, or they can be installed laying two (2) vertical, followed by two (2) horizontal, then two (2) vertical again. Either way 22” squares will be formed on properly installed projects.
 |
|
Please note: It is important to install the longer length of the tiles/mats/blocks/pavers against the longer wall with the shorter measurement against the shorter wall. It is equally important to start the installation process farthest from the most active entrance/area to avoid any foot traffic that may damage the newly installed safety surfacing, flooring and paver products.
As seen in the photo, a chalk/string line is used to keep the products straight, continuing both horizontally and vertically. Repeat this process every couple of rows to insure a square/straight fit.
|
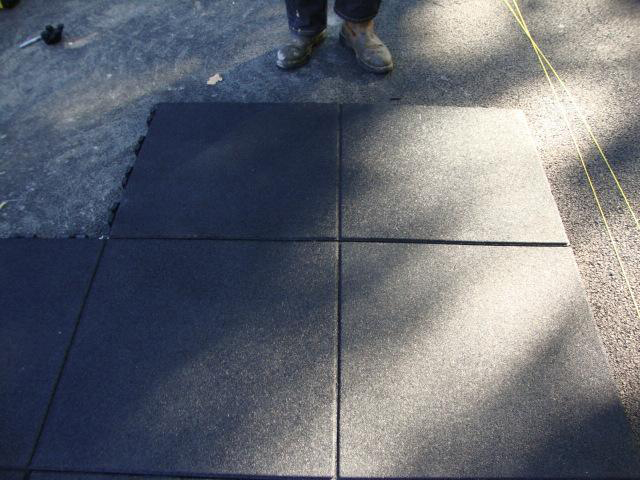
Please note: after an installation of a solid color, the floor will have a look of 22"X22" squares as seen below. This is due to the fake seam that runs down the 44" length of our tile/mat/block/paver system.It may be necessary to correct any waves in the system by slightly kicking/tapping the newly installed tiles/mats/blocks/pavers back in place. This will ensure that each and every product will interlock with the continuing rows and columns safety and securely throughout the installation process.

Unless designs and patterns do not allow, Installers MUST install our products using a "step & repeat” method of installation, similar to installing "brickwork", lining real seams up with fake seams. This type of installation will also extend the life of your surfacing, flooring and paver investment.

If the retaining perimeter is not exactly square or in an equal multiple, then cutting of the perimeter will be required. It is advisable to avoid having cuts less then six (6) inches. This is not always possible but in many cases it can be avoided with proper planning and preparation.
Adhersion/Gluing Down To Sub-base:
Unity does not provide the ENTENDED warrantee’s/guarantee’s on our products unless a sufficient amount of recommended adhesive/glue is used to cover the entire installation (job) process, especially the interlocks. Temperatures below 40 degrees will retard the curing of the standard adhesives/glue. Do not store the adhesive in temperature below 50 degrees and above 100 degrees. Do not leave adhesive/glue in direct sunlight as it will further complicate the installation process.
When adhesives/glues are required and/or needed, a one part chemical compound will begin to harden in about 15 to 30 minutes. Once used on our products, it will begin to harden in 30 to 45 minutes. Complete hardening will require several hours – usually overnight. For trowel-down installations (usually for transitional ramps on ground level installations), do not spread more adhesive/glue that you can reasonably expect to use on the products you intend to install within the time frame needed. As a trowel becomes worn on the sub-surface/sub-base, the notch depth diminishes. File to specific depth during the project, using a hacksaw with a carbide blade or regular metal file.
 |
 |
The one-part urethane adhesive/glue is used most of the times during installations. When the first product of adhesive/glue is completely beaded on the outside edge, check the linear feet covered for adequacy. Obviously rough concrete or cracks in the sub-surface will affect the adhesive coverage. The knee-pads are for the workers who are on there knees working with a trowel/trimming of the interlocks. That person will be kneeling throughout the course of the project. Below: is a photograph of a tile/mat/block/paver adhered/glued underneath/underside the outside edge with our one-part urethane adhesive/glue for added strength and security.
When installing on rooftop membranes, DO NOT glue the underside of the material what-so-ever.
 |
|
The adhesive/glue comes in a large (29 oz or 858ML) tube. Therefore, a larger caulking gun is needed for adhering/gluing applications. For solid sub-surfaces (except rooftops), be sure to glue the outside perimeter of the cones (feet/legs) of the products located underneath each unit being installed. Do not glue to roof membranes unless directed by architect/engineer in writing as specified.
If the glue continues to bleed out of the tip, even after recoiling the caulking gun, one can dab the excess glue in the middle underside to avoid having glue be tracked in unwanted locations, or leave the glue tip in the middle of the male interlocks as seen in the image above. After setting the product in place, begin gluing the “male” interlocks of said product.
|
When standing on the sub-surface/sub-base material, the male interlocks should be located at the 3 and 6 o'clock positions (female interlocks at the 9 and 12 o’clock position). Plenty of adhesive/glue MUST be applied to the interlocking joints, both inside edge, AND on top (outside edge) of each male interlock to insure proper adhesion. Therefore, when the next unit (female interlocks) is jointed with the male interlocks, a sufficient amount of adhesive/glue is oozing throughout the entire interlocking system.
Once completed, start gluing the underside of the next unit and set it next to the first unit, installing the female interlocks of the second unit over the previously installed male interlocks of the first unit and repeat the process for the remaining rows. Remember to use the “Step & Repeat” pattern. Other then waste, installers should be able to use all half pieces. Any wasted units greater than 22” will result in poorly installed projects with unnecessary waste.
Keep in mind; DO NOT GLUE THE UNDERSIDE TO ROOF MEMBRANES.
Trowels, putty knifes, and other metal objects can be cleaned of dried adhesive/glue by heating with a butane torch and/or scraper. Denatured alcohol (Xylene) will clean off adhesive/glue while it is soft.
Installations Of The Products:
|
One unit of adhesive/glue should be used, then spread right before the product is installed, cut to vertical surfaces (fence, playground posts, parapets, railings, etc), and fit perfect before more adhesive/glue is used. The object here is to establish the first course of installed tiles/mats/blocks/ pavers across the area, making sure this course is properly set even and straight before continuing.
The recommended method of installation is to use the longer measurement of the product (44”) against the longer measurement of the area that the product is being installed, with the shorter measurement (22”) against the shorter measurement of area that the product is being installed. Once this is established, start in the upper left corner with the two female sides at the 9 o’clock position (short measurement-22”) and 12 o'clock position (long measurement-44”). This will allow all other units to interlock with the previously installed units.
Remember: as required for the layout, it is the male interlocks that should be trimmed with a utility knife. Trimmed products will allow for much better, quicker, cleaner and easier installations. The finished results will be outstanding, seeing little or no defects what so ever.
|
|
|
Orientation is relative to where your starting point is. If you start, assuming the first unit is in the upper left corner of the area. You will have female interlocks at the 9:00 and 12:00 o'clock positions. The male interlocks will face the 3:00 and 6:00 o'clock positions. Respective of product orientation, if you start in the upper left corner, you will work your way to the right, and eventually down to the lower right hand side/corner.
Mechanical Fasten to Ground-Level (Solid) Sub-bases:
Remember: DO NOT SCREW OR BOLT INTO OR ONTO ROOFING MEMBRANES WHAT-SOEVER. This type of installation process is meant for ground level installation only. The amount of screw-bolts shall be determined by the architect, engineer in advance. Unity recommends a minimum of four (4) screw-bolts per unit….one every 22”
 |
|
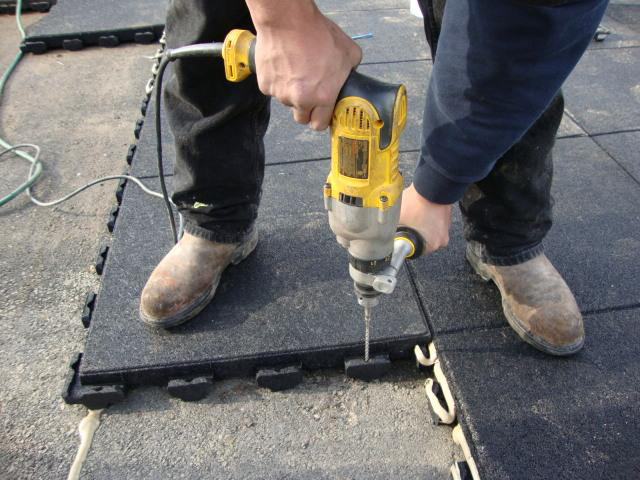
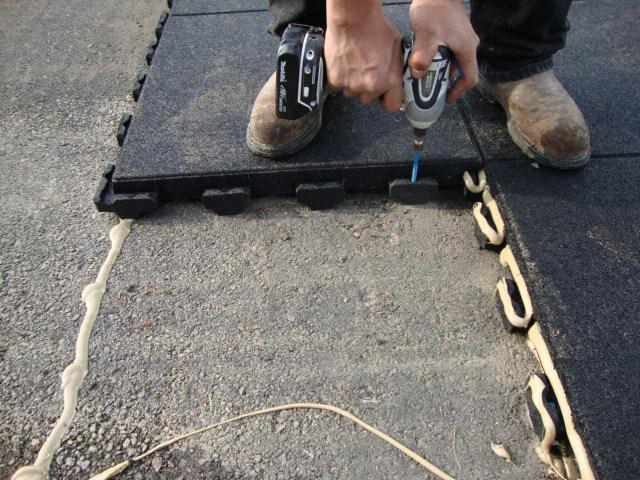
After the first row is in place and you have straighten out said row (noted in the above photographs with the use of a string-line), one can start installing the “Screw-Bolts” at the 6 o’clock position of said first row. It is both easier and less time consuming if installers pre-drill the holes through the male portion of the interlocking system as noted.
|
|
Make sure the installer pre-drills down far enough so the screw-bolt is successfully installed and countersunk within the male portion of the interlocking system effectively. Once the first row is bolted at the 6:00 position, installers can then proceed installing the screw-bolts through the male interlocks at the 3:00 and 6:00 positions on all other rows as noted in the photograph:
|
|
 |
Remember: DO NOT SCREW OR BOLT INTO OR ONTO ROOFING MEMBRANES WHAT-SOEVER. This type of installation process is meant for ground level installation only.
The “Step & Repeat Process:
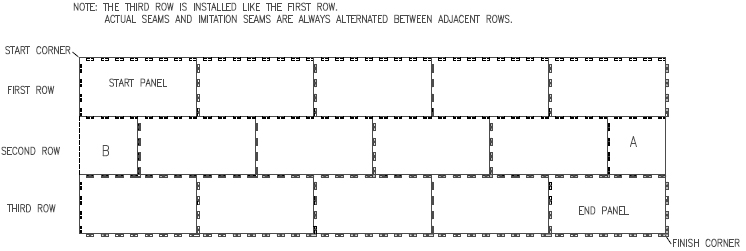
To begin the process, as described previously, start in the upper left corner with the two female sides at the 9 o’clock position (short measurement against shorter wall) and 12 o'clock position (long measurement against the longer wall). Place the next piece in by dropping the female interlocks of the second product directly over the male interlocks of the first product as seen below. As a result, the interlocks from product-to-product will be completely covered and interlocked.

Product orientation to these units and all of the following units must be identical to that of all odd numbered rows. From your start position continue working toward the right and then with the next row working down. Simply lay each female portion of the unit over the male portion of the previously installed unit thus continuing with the “step & repeat” pattern to stagger the seams.
 |
|
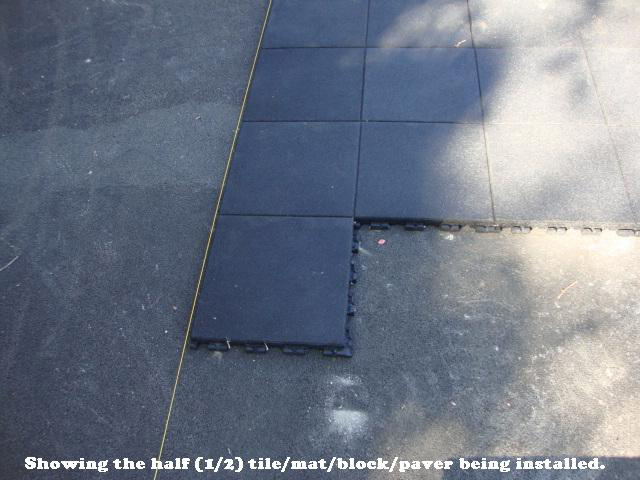
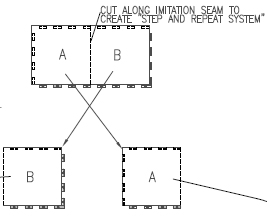
Cutting a full tile/mat/block/paver in half: Simply cut along the fake seam to generate two equal halves. Proceed by Installing the right half on the left side of the second row; and the left half installed on the other end (right side) of the same (second/even) row.
As you continue, make certain you are following your perpendicular layout chalk/string lines and that each unit is evenly touching at their edges just beneath the factory formed radius.
|
Continuing with the placement of the second row should be staggered (start by laying the right half (1/2) of the unit on the left side of the second/even row and continuing to the right with full size (double) tiles/mats/blocks/pavers to stagger the seam (as if you were installing brickwork). This should establish the "step & repeat" patterns as shown in the image below. The left half of the cut tile should be installed on the other end of the second row and should interlock with the already installed units. Depending in the installation, half pieces are cut for every even row with BOTH halves being utilized. Full units are installed every odd row. Rarely will overall measurement alter this system of installation.

When you reach the other perimeter walls, bordering system, retainers, parapets, etc., take a measurement and cut these units as required to fit. Any gaps may optionally be filled with rubber or silicone. Minor variations are inherent in all rubberized safety surfacing, flooring and paver products including these. However, it should be recognized that good installers will not have any gaps.
Properly mixing units from one batch to another will blend variations to produce a handsome pattern. Keep in mind, try to install as many full units as the adhesive/glue will allow. Don't forget to trim the male interlocks as needed. Avoid traffic on newly installed tiles/mats/blocks/pavers overnight. Adhesives/glues may be slippery when first spread and the product may shift positions even if only slightly disturbed. Below is a cheat sheet that can be followed for proper installation of the “Step & Repeat Process” in its entirety.
Don't forget to glue the interlocks as you proceed. If it is a solid (ground level) installation, don’t forget to use the bolt-down application and remember to adhere/glue the underside outside edge of each unit being installed. Do not use bolts or glue the underside on rooftop installations.
|
|
|
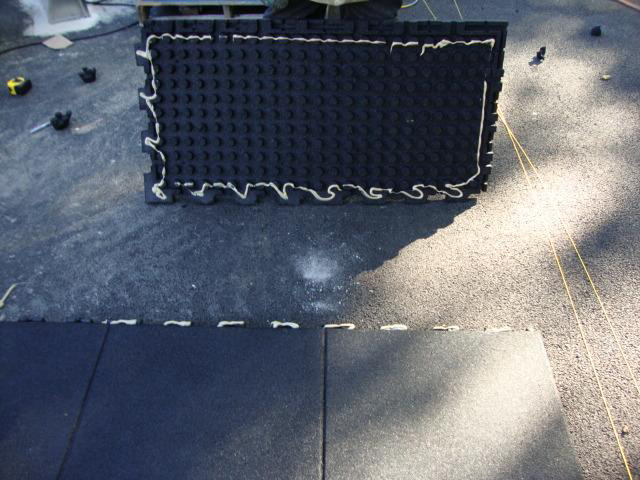
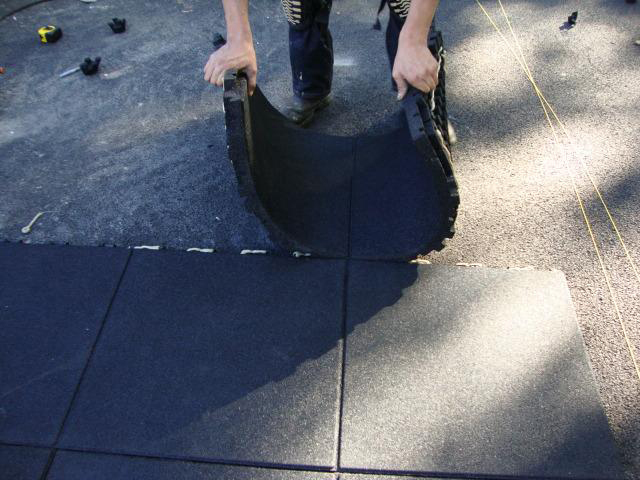
Unity has found that after the underside is glued, it is much easier for the installers to fold the product for faster transport from the skid (pallet) to the install location (as noted below).
Once in place, the installer should line the fake seam up (of the product being held by the installer) with the real seam (of the product already installed) as noted herein. The installer should then begin to unfold the product in place, thus locking the interlocking tabs along the way.
|
|
Said units should be laid in place naturally, so as to ensure good contact with even joints. Do not exert too much pressure on the products. Sometimes, due to necessary traffic on the newly installed units and/ or sub-surface/sub-base imperfections, our products may not meet perfectly.
Due to the staggered interlocks, you may need to walk on or kick the units to get them to go into place. This will lock our products tightly together for many years of hassle free enjoyment. You may need to walk on or kick the units to insure that all the adhesive/glue has completely oozed from the interlocking joints.
|
|
 |
Because of the new “Button-Lock™” Technology, It may be necessary to force the pimples (projections), found in-between the female interlocks, into the dimples (recessions) found in-between the males interlocks joints using your thumbs. A flat-head screw-driver can be used to help as well.
Measuring and Cutting of Tiles/Mats/Blocks/Pavers:
|
|
|
All cut edges should NOT be exposed to eyesight. Try to hide “lead-in” cuts by cutting where it is less visible (under equipment, along fake seam, etc.). This will insure a first class finish in appearance.
Measuring and cutting our products to fit tight to a wall, parapet, fence, boarder or playground post can be done by taking accurate measurements from the installed field to the wall, parapet, fence, boarder or playground post, fence post, vent stack, etc.
|
Once this occurs, it is important not to forget your measurements when transferring them to the unit being cut. As the old saying goes: “Measure twice…………..cut once”.
Using a simple device (such as a piece of scrap cardboard) to transfer the wall, parapet, fence, boarder or playground post measurement should be easy once you have established the center pivot.
To be safe make the cut a little smaller in size (~ ¾”) to be occupied and UNDERCUT the product for a tight fit. We recommend undercuts that are on a 30-40 degree angle IN as noted in the photograph below. Meaning, when measuring the product itself, the bottom of the product will have a bigger measurement than the top of the same product.
All cut edges must not be exposed to eyesight and any cut with a gap greater than ½” should be address accordingly. This will insure a first class finish in the appearance. Although not recommended, the use of a filler, such as a rubber or silicone, can be applied to fill any gaps at cut edges. Dull blades make the work more difficult and cause injuries by forcing a cut. Change blades often. Keep jig-saw blades moist with soap.
If a cut is close to the fake seam, use the fake seam as the lead-in, then turn in to make your actual cut in order to reduce any eye-sours.

It is extremely important to glue any and all "lead-in" cuts.
Cutting of Transitional Ramps at the corners:
Our transitional ramps are the same size of our tile/mat/block/paver products (~22” X 44”) containing a continuous “female” interlock that will lock with the “male” interlocks. Here you see an installation where our transitional ramps need to be met and mitered on a 45-degree angle to create a corner.
When cutting to create this, or any corner, make sure your measurements are correct and that you use a “square” and a “straight-edge” to make your cuts accurately. Remember: cut on an angle in (underscore) using a utility knife (as pictured). If using a jig-saw angle your blade on a 30 to 40 degree angle into the finished product to insure a tight clean finish for the top.
Once the 45 degree corner is mitered/cut, apply a sufficient amount of adhesive/glue on the underside of the ENTIRE transitional ramp using the notched trowel as mentioned above. Spread in normal back-and-forth motion to consume the puddle.
It is extremely important to apply adhesive/glue on the outside edge……….especially the tip. This will prevent any future problems. Once adhered/glued, simply flip the transitional ramp over and install the product lining the cut corner/edge to the factory corner of the tile/mat/block/paver as noted below:
It is both extremely important and necessary to apply a bead of glue along the cut/mitered edge of the transitional ramp. This will significantly reduce the chance of the two seams from separating/popping.
Once adhered/glued at the cut/mitered corner, repeat the installation process for the other corner as noted above. Upon completion, your corner should have a look as if it came from the factory floor.
Beneficial Tips:
Factory edges: Always butt factory edge to factory edge. Cuts go against the outside edge of a wall, fence, parapet, boarder, playground post or other vertical surfaces. Keep in mind, when installing the half (1/2) product for the "step & repeat" pattern, the cut edge should never be against the factory edge. Cut edges should always be at the very end of the surfacing, flooring and paver area being installed. If you have cut units greater than 22”…….you are doing something wrong.
Gluing Products To Boarding System: It is important to remember, when installing our products against a bordering system such as concrete (curb/walkway), wood, asphalt, blacktop, etc.; Use sufficient amount of glue/adhesive along the side-wall of the product that is going against the boarding system as noted below.
Once a sufficient amount of glue/adhesive is in place, it is important to make sure you connect the interlocking tabs to the previously installed unit first. Additionally, it is important to install the product as close to the boarding system as possible. This will insure that adequate glue/adhesive will remain on the bottom feet (cones/legs) for proper glue-down installations without being “shifted off”.
Once installed, it may be necessary to position the product against the bordering system as shown below. This can be done by hand, or using your feet as useful force in doing so. However, it is important to make sure your line of installation remains straight as noted earlier in this Installation Guide/Manual.
When cut tiles are present at the edge, Spray-Form should be applied to toward the bottom of the bordering system first, as well as glue toward the top of the bordering system to insure a good footing throughout the installation process.
Transitional Ramps/Edges: The transitional ramps will have “female” interlocks that will lock with the “male” interlocks typically found at the 3 and 6 o’clock positions. At the 12 and 9 o’clock positions, the transitional ramps will need to be installed “butt-to-butt” due to the adjacent “female” interlocking joints. As transitional ramps meet, due to temperature changes during the installation process, there may be a slight gap as seen in the photograph below.
Simply squeeze the ends together and hammer in concrete nails or screw into a solid sub-surface to keep the products mooshed/squeezed together as seen in the picture below. If solid sub-surface/subbases is not available, simply use a heavy weight or object in place of the nails, and allow to dry
Please allow the glue to set overnight (24-hours) before removing the nails or heavy weights/objects.
Cutting around doors: Most doors have exactly the same profile. If there are several doors to cut around, it is often easier to make a template out of cardboard and use it to trace cuts. You might consider cutting the bottom of the door to the approximate thickness of the products being installed. Depending on its application transitional ramps or “saddles” may need to be installed to prevent any tripping hazards that may occur.
Small cuts around walls, fences, boarders, parapet, playground posts, etc: The smallest cut against these areas should be at least nine (9") inches wide. Smallest of pieces do not often secure well. Cut back to fill in the area enough to give a 9" piece at the wall, fence, boarder, parapet, etc. If you have no choice in the matter simply use excess glue in this area.
|
Cutting around obstructions: Sometimes a post, pillar, floor drain, roof drain or other obstructions occur anywhere in a room and/or outside area. Since the material is of a flexible rubber, cutting the 23 individual units allowing no clearance around the support is highly recommended. If it is larger, this notch or gap may be back-filled with rubber or silicone filler. However, it should be noted that cuts should always be tight. While installing the field of full tiles/mats/blocks/pavers, including around the obstructions can cause the horizontal and vertical lines to become uneven. Holes in the center portion of the unit will require a lead in cut. Lay this cut out using the shortest path or down the fake seam so as to better hide the lead-in cut. Using fresh blades and taking your time leads to a cut that is less visible. A cut using multiple units may require the installer to assemble multiple units to generate the complete cut as noted in the below:
|
|
|
It is extremely helpful if the lead-in cuts are cut on a 30-40 degree angle as it is just as important to adhere/glue the lead-in cut with sufficient adhesive/glue that will work effectively. Cutting on a 30-40 degree angle will allow the glue to set IN the lead-in cut and not just ooze down and out. Adhering/Gluing the lead-in cut will prevent future problems later on.
|
|
|
Fielding: You can establish the field without installing the piece that will eventually have to be cut, by using full-length scraps as spacers.
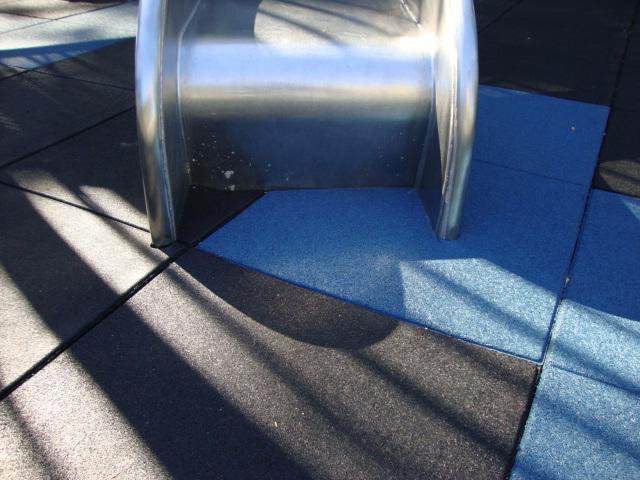
Once the row has been established, complete the area around the obstruction. If the slope around the drain or object is so great that the two units (when installed) is not even, sandbag the raised unit(s) overnight to create a “flush” look as noted in the grey unit below.
Please note: the gray tile/mat/block/paver near the doors……that is where the drain is located. Drains of all types can be either recessed or exposed - depending on the architects, engineers, designs and/or owner’s approval. Here it was easier to change the color for easier access to drain location.
|
Trouble Shooting Areas:
In the rare event that a loose unit shows in a completed installation, make sure the following examinations take place:
1. Remove the unit: If adhesive is visible in the sub-floor but not visible on the back of the unit, or vice versa, it is apparent that the installer incorrectly installed the unit.
2. Remove the unit: If the adhesive is visible on the back of the unit, but not visible on the subsurface, it is apparent that the sub-surface was wet, moist, greasy, dusty, and dirty, etc.
In either case the loose units can be permanently stuck back into place with sufficient adhesive/glue after the problem(s) have been analyzed and corrected.
The manufacturer accepts NO responsibility for moisture accumulation underneath our products after installation, which may cause failure in the adhesive, or other failures not related to defects in materials. It is important to address these moisture problems in advance.
Setting Time:
Avoid any and all traffic over finished surfaces for a minimum of twelve (12) hours, usually overnight. The next 12 hours may have minimal traffic allowing the units to settle into place. Normal traffic may resume after a full twenty-four (24) hours, after completion of the entire project.
Maintenance and Cleaning Finishes:
It is extremely important to keep any and all debris away from the joints/seams at all times. Either broom sweep, leaf-blow or vacuum the area clean. Remember to focus your maintenance and cleaning at the joints/seams to avoid future problems such as “gapping”. A sharp object (such as a screw-driver) may be needed to be applied at the seam(s) for areas that has more debris then others. This tool will loosen up the stubborn debris for easier cleaning, blowing and/or vacuuming. Said maintenance will certainly extend the tiles/mats/blocks/pavers usage for many more years to come.
Painting:
After many years of use, like any other products on the market, Unity’s products can be painted for a fresh new look. We provide the necessary paints that can be sprayed on or simply rolled on for a brand new look. This can provide less heat build up and extended life of the products for many more years to come.
Rooftop Applications/Installations:
Installers must apply adhesive/glue to the male interlocking joints only. Adhesive/glue must be applied inside the joint and top of the joint – outside edge, at all times. This type of adhesion/gluing process will insure that sufficient amount of adhesive/glue oozes throughout the interlocking connection to avoid wind up-lift. Do not use the adhesive/glue on the underside (bottom) of our tiles/mats/blocks/pavers for rooftop applications what-so-ever. Adhering/gluing the underside of our products to rooftop membranes will most certainly void the warranty/guaranty of the roofing system.
Please contact the architect, engineer, designer, building owner, consultant, roofing manufacturer, green roof designer directly for installations requiring glue-down.
DO NOT COVER DRAINS OR DRAINAGE OUTLETS WITH THE FABRIC/MESH WHAT-SO-EVER, AS IT WILL IMPEDE THE FLOW OF WATER.
To provide a rooftop with the proper warrant/guaranty the following must be done:
1. Pitch and drainage: Adequate pitch to drains must be per the roofing manufacturer’s specifications. Said “pitch” shall be maintained throughout the rooftop process and installation process.
Ample drains and pitch must be installed and maintained to eliminate any and all ponding (puddles) within forty-eight (48) hours after precipitation.
Internet/On-line Information:
Unity also offers our installation services by video. Said videos are full (and short) length showing the complete (and step-by-step) installation process can be found on our Youtube® channel: https://www.youtube.com/watch?v=KtyYyU3q_vE; or simply go to our Video Page.
Click the download button to view a pdf version: