Architectural Specifcations
Fabric/Mesh
Filter/Landscape Fabric - Typical Specifications
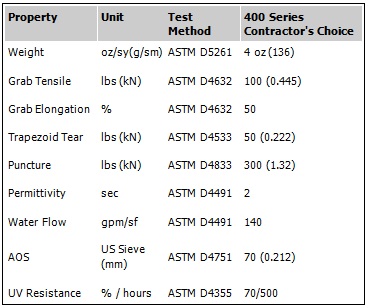
Properties
Material
Color |
Value
Polypropylene
Black
|
Follow all manufacturers’ instructions found in the general “installation guide/manual”.
Begin by removing any foreign debris from the area.
For GROUND LEVEL installations:
1. Dig out the area (6-8” deep, depending on the thickness of tile being installed) where you want the products installed.
2. Tamp ground area level, ready for 1st layer of this fabric / mesh.
3. Install your first layer of fabric / mesh overlapping the area by 3” (inches).
4. Add the board system as required (see specification), usually concrete, asphalt, wood, plastic or rubber)
5. Add recycled crushed stones, RCA, stone blend, item-4 &/or stone dust within your boarded area. If you are installing our 2 ½” thick rubber tiles/mats/blocks/pavers, you want your compacted area to sit 2 ½” (inches) below grade. This will insure that the top of our rubber products meet with the top of your finished bordering system so there is no tripping hazard on or off the area. Again, it is not required, but recommended.
6. Compact area level using a vibration machine. MAKE SURE ALL WAVES, HILLS AND VALLIES ARE REMOVED. Sand or a fine powder may be needed to fill such voids to give the area a nice, clean, LEVELNESS that is required.
7. Once compaction is met, roll out your second layer of fabric / mesh, cut to fit accordingly with the said boarding system. Don’t forget to overlap the seams at least 6”.
8. Slits are cut where fabric will go around playground posts or objects.
9. Fabric is put in place and stapled to the side of your boarder….typically wood.
This product is not needed if your sub-base material that is of a solid nature such as: asphalt (blacktop), concrete (cement) or any other SOLID sub-flooring material.
Unity’s tiles/mats/blocks/pavers must be installed in accordance with our specified installation guide/manual.
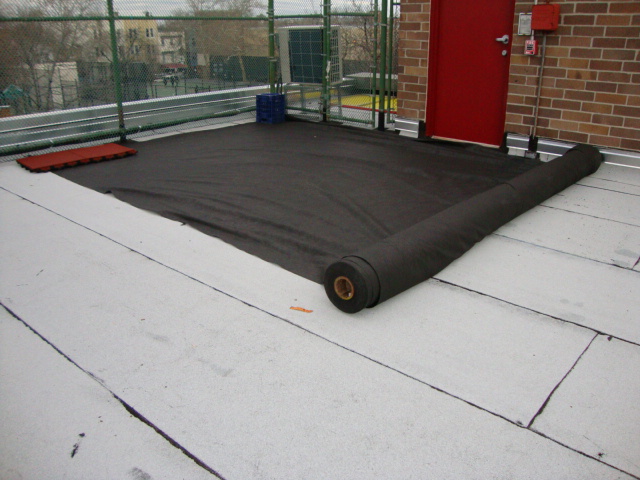
For ROOFTOP installations:
Most often (600 sq. ft. or more) the fabric/mesh is installed prior to our products being installed on rooftop membranes. The fabric/mesh is a matter of individual preference on smaller, residential applications, 500 sq. ft. or less if only approved as such by the architect, engineer, designer and/or owner in advance.
To install the fabric/mesh in this manner, follow these steps:
1. Remove any foreign debris found on the roof membrane by sweeping or blowing the area clean.
2. Make sure all debris is free in, and around, roof drains, pitch-pockets, etc.
3. Apply the fabric/mesh by rolling out a single row, while at the same time; begin installing products, following all manufacturers instructions found in the general installation guide/manual.
4. Once two rows of tiles/mats/blocks/pavers have been successfully installed, continue rolling out a second row of fabric/mesh overlapping the first row by 6” (inches) and continue to install our products as you go. This will insure that the fabric/mesh does not blow away, or create problems during the installation process.
5. Don’t forget to: Cut a hole where playground equipment posts or other objects, such as drains will go. It is always recommended to cut around all drains for easier access when maintenance is required.
Seller makes no warranty; express or implied, concerning the product furnished hereunder other than it shall be of the quality and specifications stated herein. Any implied warranty or fitness for a particular purpose is expressly excluded and to the extent that it is contrary to the foregoing sentence, any implied warranty of merchantability is expressly excluded. Any recommendations made by Seller concerning uses or applications of said product are believed to be reliable and Seller makes no warranty of results to obtain. This data sheet supersedes all previous data sheets for this style and is subject to change without notice.